

ROS Development in Docker
If you use the Robot Operating System (ROS) and you are frustrated with system dependencies, incompatible ROS / Linux operating system versions, and non-deterministic builds, then this article is for you.
For each of my ROS projects, I create a Docker development environment to isolate the ROS environment from my host system’s environment. This allows me to easily run an old version of ROS (e.g., ROS Kinetic), on a newer version of Ubuntu (e.g., Ubuntu 22.04 Jammy). The inverse is also true: you can run a newer ROS version on an older Linux distribution. Docker is conceptually similar to a very light-weight virtual machine, but Docker allows you to more easily share hardware resources between the host machine and the Docker container.
Throughout this guide, I will be referencing an example git repository (https://github.com/SyllogismRXS/ros_docker_setup) that I created to demonstrate how to set up a ROS Docker development environment.
There are a number of other guides to setup a ROS Docker development environment:
I think that many of the articles focus on basic Docker commands, instead of an opinionated description of how to organize your ROS workspaces and repositories to facilitate collaborative development and continuous integration (CI).
Design Requirements
In our ROS Docker setup, we want to be able to:
- Use our preferred code/text editor on the host system.
- Launch ROS GUI programs from within the container.
- Leverage the host system’s GPU, if available.
- Make it easy for new developers to start building / writing ROS code.
- Minimize long
dockercommand line arguments / options.
Host System Dependencies
As a warning, I’m writing this guide from the perspective of someone who uses Ubuntu for development, but most of the instructions should apply to anyone using a Linux-based (amd64) system. (Note to self: try these instructions on my Windows 10 partition).
-
Install Docker. Make sure to follow the post-installation steps, so you don’t have to use
sudoto run Docker.
That’s all you should need! We will be installing all the messy ROS bits inside of a Docker container, so your host system will stay nice and clean.
Host Directory Setup / Docker Build
On my host machine, I keep all of my ROS projects in a folder located at
~/ros and I will use that directory in this guide to be explicit, but you can
use a different root directory.
-
Create the
srcdirectory in a new ROS workspace:mkdir -p ~/ros/ros_docker_example/workspace/srcIn this case, the
ros_docker_exampleis the name of my current ROS project. I keep multiple ROS projects in the~/rosfolder. Each ROS project gets its own set of Docker / Compose files. -
Create a
datadirectory, which will be used to facilitate exchanging files (e.g., ROS bags), between the ROS Docker container and your host system:mkdir -p ~/ros/ros_docker_example/data -
Clone the ROS Docker setup files from my GitHub repository under the
ros_docker_exampledirectory:cd ~/ros/ros_docker_example git clone https://github.com/SyllogismRXS/ros_docker_setup.gitThe
~/ros/ros_docker_exampledirectory should now contain the following: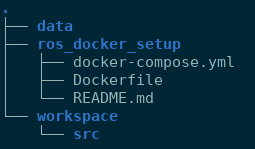
-
Since this ROS Docker example targets the ROS2 Humble distribution, clone the ROS2 example repository into your workspace’s
srcfolder. We will be building these example projects to test our build system. You would replace this repository with your own ROS repositories.cd ~/ros/ros_docker_example/workspace/src git clone -b humble https://github.com/ros2/examples.git -
We will now create a
.envfile in the same directory that contains thedocker-compose.ymlfile with your user’s ID and group ID. This is needed, so that we can launch ROS GUIs from within the Docker container.cd ~/ros/ros_docker_example/ros_docker_setup echo -e "USER_ID=$(id -u ${USER})\nGROUP_ID=$(id -g ${USER})" > .envDocker compose will automatically read the
.envfile before runningupcommands. -
We can now build the Docker image in the
ros_docker_setupdirectory:docker compose build
Test the Docker Environment
-
Bring up the Docker container, step into it, and run the minimal subscriber example
docker compose up -d dev docker exec -it ros_humble /bin/bash ros2 run examples_rclcpp_minimal_subscriber subscriber_member_function -
In a different terminal, step into the already running container, and run the minimal publisher example:
 docker exec -it ros_humble /bin/bash
 ros2 run examples_rclcpp_minimal_publisher publisher_member_function
At this point, you should see ROS messages being printed to the terminal.
-
Launch the rviz2 GUI from inside the container:
 docker exec -it ros_humble /bin/bash
 rviz2
Development Use Case
The primary use case for this Docker setup is to develop ROS packages. After
building the Docker image, you can start a container (once with the up command,
enter into it (with the exec command), run a build command (with colcon),
and run other ROS commands. For example, you can start and enter a container:
docker compose up -d dev
docker exec -it ros_humble /bin/bash
At this point, you can use your host’s code/text editor to make changes to code
in your host’s workspace src directory and they will immediately take effect
in the container’s src directory. Then, inside of the container, build the
workspace with the command:
colcon build --symlink-install
You can use multiple Docker container terminals by running docker exec -it
ros_humble /bin/bash in another terminal after the up command was already
run once.
Detailed Notes
The following are detailed notes that describe some of the Docker
options/features and why they were chosen. This section is most helpful if you
following along with the docker-compose.yml and Dockerfile commands in the
ros_docker_setup
repository.
docker-compose.yml
-
The
docker-compose.ymlfile contains two separate “services”:devanddev-nvidia. Thedev-nvidiaservice contains additional flags to share the host’s NVIDIA GPU with the Docker container. In order to use thedev-nvidiaservice, you will need both an NVIDIA GPU and you will need to installnvidia-docker2using NVIDIA’s instructions. -
The
USER_IDandGROUP_IDvariables are passed from.envto the Docker build command via the build arguments:args: USER_ID: ${USER_ID:-0} GROUP_ID: ${GROUP_ID:-0} -
The
network_modeis set tohostto allow the container to have full access to the host’s networking system. This is fine for a development environment, but should be made more restrictive in a deployed container (not our current use-case).network_mode: "host" -
The
DISPLAYenvironment variable display is passed from the host to the container to enable GUI applications. In addition, the.X11-unixand.docker.xauthfiles are mounted from the host to the container in thevolumessection to enable GUIs.environment: - DISPLAY=${DISPLAY} # Pass the display for GUI - QT_X11_NO_MITSHM=1 # Needed by QT programs - XAUTHORITY=/tmp/.docker.xauth -
The
srcanddatadirectories of the workspace are mounted from the host to the container in thevolumessection. It is important to note that thevolumessection of thedocker-compose.ymlfile is only relevant duringupandruncommands, not during thebuildphase. During build time, the code is copied into the Docker image with theCOPYcommand in theDockerfile.volumes: - /tmp/.X11-unix:/tmp/.X11-unix:rw - /tmp/.docker.xauth:/tmp/.docker.xauth:rw - ../workspace/src:/home/ros/workspace/src - ../data:/home/ros/dataThe
.X11-unixand.docker.xauthfiles are mounted to help with launching GUIs from the container.
Dockerfile
-
The
Dockerfilecontains the instructions to build the ROS Docker image. OurDockerfileis based on theosrf/ros:humble-desktop-fullDocker image provided by the main ROS folks (OSRF, OpenRobotics, etc.) This image already contains an installed version of ROS Humble and many of the GUIs and build utilities, which we will be using.FROM osrf/ros:humble-desktop-full MAINTAINER Kevin DeMarco ENV DEBIAN_FRONTEND noninteractive SHELL ["/bin/bash", "-c"] -
After declaring the
FROMimage and some basic metadata, we install a specific Debian package:RUN apt-get update \ && apt-get install -y \ python3-pip \ && rm -rf /var/lib/apt/lists/*In your own Dockerfile, you would augment this Debian package installation list to fit your needs. You should list ROS package dependencies explicitly in their respective
package.xmlfiles, but sometimes there are missing dependencies in upstream packages. -
Using the
addusercommand, we create arosuser with the sameUSER_IDandGROUP_IDas your host system, which enables GUI applications. In addition, therosuser can issuesudocommands without a password. Again, this is fine for a local development environment, but you wouldn’t do this in a deployed Docker image.ENV USERNAME ros RUN adduser --disabled-password --gecos '' $USERNAME \ && usermod --uid ${USER_ID} $USERNAME \ && groupmod --gid ${GROUP_ID} $USERNAME \ && usermod --shell /bin/bash $USERNAME \ && adduser $USERNAME sudo \ && adduser $USERNAME dialout \ && echo '%sudo ALL=(ALL) NOPASSWD:ALL' >> /etc/sudoers -
Run
rosdepupdate. Also, add the sourcing of the main ROS system’s setup file (/opt/ros/humble/setup.bash) and colcon’s setup file to therosuser’s.bashrc. This provides therosuser with access to the ROS environment every time the container is entered.# Run rosdep update, add ROS, Gazebo, and colcon setup to ros user's .bashrc RUN sudo apt-get update \ && rosdep update \ && echo 'source /opt/ros/${ROS_DISTRO}/setup.bash' >> /home/$USERNAME/.bashrc \ && echo 'source /usr/share/colcon_cd/function/colcon_cd.sh' >> /home/$USERNAME/.bashrc -
Near the end of the
Dockerfile, the code is copied into the image with theCOPYcommand.COPY --chown=ros ./src srcThe code is copied into the image, so that we can install it’s dependencies and make sure it builds deterministically. However, when the user runs the
docker compose upcommand, the code on the host system is mounted over the code that was previously copied into the image. This allows changes to the repository code to show up immediately inside the container for incremental builds. During the initial building of the image, the code that was copied into the image is built with:RUN source /opt/ros/${ROS_DISTRO}/setup.bash \ && sudo rosdep install --from-paths . --ignore-src -r -y --rosdistro=${ROS_DISTRO} \ && colcon build --symlink-install \ && echo 'source ~/workspace/install/local_setup.bash' >> /home/$USERNAME/.bashrcThe ROS package dependencies listed in the
package.xmlfiles are installed during therosdep installcommand.colconis used to perform the workspace build. In addition, the workspace’slocal_setup.bashis added to therosuser’s.bashrcfile, so that it’s resources are immediately available when the container is entered.
Wrap Up
By maintaining a Dockerfile and a docker-compose.yml file for each of your
ROS projects, you can isolate your ROS development environments from your
host’s operating system. It might be overkill to create a set of Docker files
for each ROS repository, but you might want to create a Docker development
environment for each set of ROS packages that you use for an overall
project. Typically, this would be at the ROS workspace level, but it could
cover multiple workspaces as well.
Finally, I use vcstool to track the various git
repositories in my workspace’s src folder. It is common practice in ROS
development to maintain a vcstool .repos file, which contains a list of the
git repositories that your project depends on for source builds. I track my
project’s .repos file alongside the Dockerfile and docker-compose.yml
files. Take a look at our Docker configuration
repo for the Clearpath Dingo for
an example.
Looking Forward
In a future post I will describe how I use direnv to
quickly open multiple ROS Docker container terminals.

Leave a comment